How to measure verandah fretwork for a replacement
Published
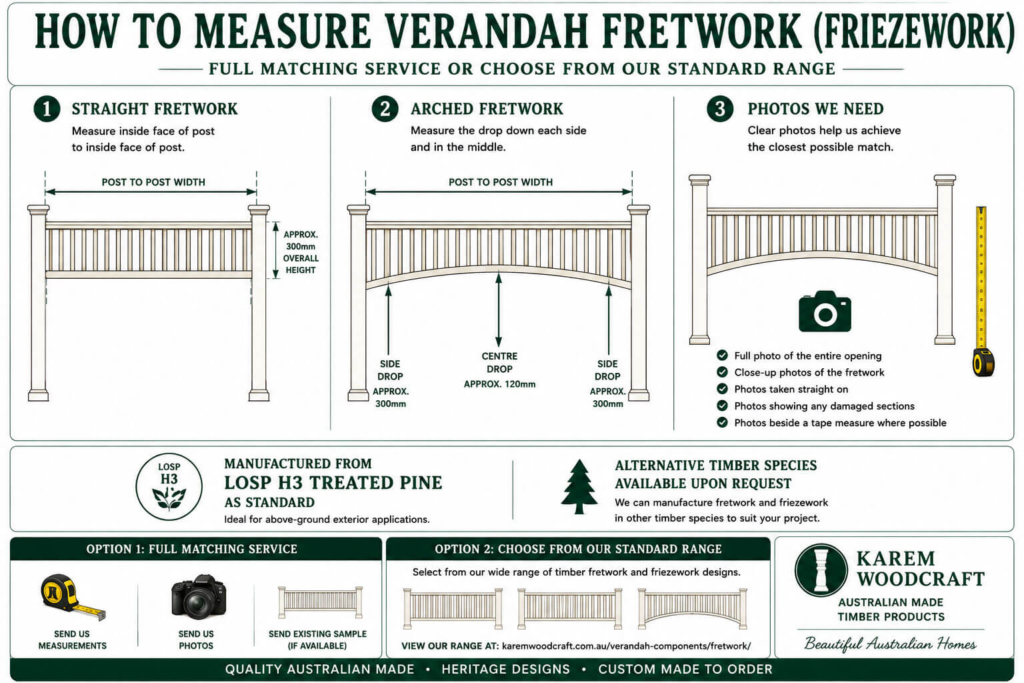
A replacement fretwork panel has two jobs. It has to fit between the posts and look like it belongs beside the panels you’re keeping. The measuring video on this page shows the starting point. Use the steps below to turn those observations into a set of labelled measurements and photos you can send to the workshop.
Choose a reference panel
If the damaged panel has sagged or lost pieces, take your pattern measurements from the best intact panel on the verandah. Measure the opening for the replacement separately. On a corner verandah, photograph the front and side runs and identify which one needs work. A detail can look identical from the street while its width, drop or end treatment changes on the return.
Draw a front view of the opening, including the posts and the underside of the beam. Mark the distance between the finished inside faces of the posts where the top of the panel will sit. On a straight panel, mark the depth from top edge to bottom edge. If it arches, mark the drop at the left end, centre and right end, all from the same top edge. Add the thickness of the timber if you can reach it safely. Keep measurements taken from the old panel separate from measurements taken between the posts.
Show how the timberwork fits together
Take a square-on photo from far enough back to include the whole bay. Add close photos of the rail ends, the repeating detail and any corner brackets that share the opening. Put a tape or ruler against the timber for the close photos. If a bracket partly covers the fretwork, tell us what you can see of the join and let your builder confirm the hidden dimensions.
For an arched replacement, note how the curve meets the posts. A shallow rise with broad ends reads differently from a deep arch even when the two panels have the same width. If you are choosing a fresh design, browse the external timber fretwork range and compare it with the arched and straight fretwork examples. The FR1 assembled panel and FR5 assembled panel give you two product references you can show your installer.
Keep the character of the old panel
Look at the pieces your eye picks up first: the width of a turned upright, the spacing between motifs and the curve of the lower rail. If the original was painted repeatedly, photograph a sound area where the edges are still clear. A builder may already have a loose piece that can be used as a sample. Label it with the bay it came from and include a photo showing its original position.
Before you ask for a quote
Put the photos and sketch in the same enquiry. Give each bay a label, write the dimensions in millimetres and tell us which details matter most for the match. Mention the finish you plan to use and whether you want help comparing an assembled panel with a kit. If several bays look alike, confirm each width before ordering. For the quickest check, contact Karem Woodcraft with the measurements you’ve taken and note anything you couldn’t verify.
Talk to the workshop
Don't hesitate to get in touch with us — we would love to discuss your order. Call 03 9720 7266 or 1300 547 581, or send us the details below.